

Introduction: How to Make Bread From Scratch


This instructable is a lesson in my free Bread Class. To enroll, click here.
Congratulations on deciding to became a baker! You may be thinking to yourself, "Oh gosh, that sounds a lot more serious than I expected this class to be." But in all honesty, baking is about making simple ingredients shine, and giving them the time they need to develop flavor. So remember, keep it simple, and be patient, when you master those skills, you're truly a baker.
This Instructable goes over the basics of how to make bread from scratch.
Follow along and learn how to measure and mix ingredients, and shape the dough for baking in a loaf pan. Along the way, we will learn a bit about the food science that makes breadmaking feel a little like chemistry class. Moreover, you will learn to start honing your baker's intuition. Your first loaf is only the beginning.
Step 1: Tools and Ingredients
To follow along in this lesson you will need the following:
Tools
- Scale
- Bowls for mixing
- Bowl scraper
- Probe thermometer
- Dough whisk (optional)
- Bread lame or super sharp knife
- Baking pan, preferably a loaf pan, but a cookie sheet works in a pinch.
- Parchment Paper
Ingredients
- 500 grams (~4 cups) white bread flour + additional flour for dusting, so keep a dish of flour nearby.
- 325 grams water (a little less than 2 3/4 cups) , at 110 degrees F, ~43 degrees C.
- 12 grams (~2 teaspoons) dry active yeast
- 12 grams (~1 tablespoon) salt
12 grams (~1/2 tablespoon) sugar

Step 2: Weighing Out Your Amounts
Baking and accuracy go hand in hand. We measure ingredients in weights to assure that we are consistently adding the same amount of ingredients. Measuring the volume of flour is much more inaccurate than measuring its weight, since different flours compress differently, and one cup of whole wheat flour weighs more than one cup of white bread flour. If you need equal weights of those ingredients, it is important to use a scale and not a measuring cup.

We will need to determine weights of ingredients with a bowl on our scale for every lesson in this class. This means we have to tare the scale. When we tare the scale, we reset the scale to zero so that we may add ingredients incrementally, without having to use any other measuring tools besides a scoop or water pitcher. To tare your scale:
- Place your bowl on the scale
- Find and depress the 'tare' or 'zero' button on your scale.
You may tare the scale between adding each ingredient. For example:
- Place your bowl onto the scale and tare to zero.
- Measure your water in grams or milliliters into a bowl and tare the scale back to zero.
- Measure your flour into the same bowl until you have your desired weight in grams
- and so on and so forth :)
One tool for all your measuring needs! How cool is that?!
Step 3: Proofing Your Yeast

Proofing, or giving yeast time to verify fermentation activity, is a huge part of bread making. When you see this as a step, we as bakers are making sure our yeasts can 'prove' their activity and alive-ness, signifying the beginning of fermentation. This process is occasionally called out as 'blooming the yeast' in certain recipes.
For this first loaf, we will be proofing our yeast in 110-115 degree Farenheight water. I don't have a microwave so I heat on the stove, but microwaves make quick work of this task - heat your water on medium power for 15-second increments and check the temp between reheating.
Note: When the water is too warm, we risk killing the yeast or over-activating it so that it begins to multiply too immediately. When liquids are too cold, the yeast will never properly activate. This means your dough will rise extremely slowly and unevenly, or even worse, not at all.


Now it's time for you to proof the yeast for our first loaf. Begin with 325 grams of 110 degree water in a bowl, then add a half tablespoon of sugar to the water and mix it in. (I use coconut sugar because it dissolves really quickly) Sprinkle yeast over top and quickly stir to hydrate all the yeast.


Allow the mixture to sit for 10-15 minutes until there is a big frothy layer of foam on the surface. It is then that you have 'proved' your yeasts' activity.
Step 4: Bulk Mix

The bulk mix is when we incorporate all of our ingredients before the dough begins its first rise. For this bulk mix, incorporate your dry ingredients, the flour, and salt, in a mixing bowl. Create a divot or well in the center of the dry mixture and add your proved yeast and water to the flour and salt.


I like using a dough whisk or bowl scraper to do the heavy lifting of mixing the dry and wet ingredients, but if you like, dig your hands in and get messy, you'll know your flour is hydrated enough when the dough clumps start coming off your hands or your preferred mixing tool. As flour becomes hydrated, the proteins in flour called 'gliadin' and 'glutenin' begin to bond, forming the early stages of our gluten network!


You may need to add additional flour if the dough is sticking a bit. Use a bowl scraper to get all the flour and dough from the edges of the bowl. When all the dry flour is completely hydrated and incorporated and feels tacky to the touch, wait five to ten minutes before beginning the next step - kneading.
We allow the dough to briefly rest before kneading so that the dough has a moment to hydrate more evenly before kneading. Kneading also inherently lowers the temperature of our dough as we work air into the warm water we added, so this brief rest on the countertop, also known as a bench rest, gives the yeast the opportunity to feed and ferment rapidly at a slightly warmer temperature.
Step 5: Knead
In breadmaking, we work doughs in many many ways. By kneading, folding, and stretching the dough, we help recently hydrated flour that has formed all that delicious gluten becomes organized into a structure that encourages evenly developed fermentation. The more you mix, stretch and work the dough, the tougher the gluten network becomes. Kneading pushes air into the dough's gluten network while encouraging elasticity and consistency of hydration and temperature.


This kind of dough requires about 10 minutes of kneading. The kneading process smooths, lengthens and stretches the gluten strands. You can feel that kneading is complete when the dough no longer sticks to your hands and has a smooth and consistent texture. This bulk mass will expand and rise as the yeast ferments and releases gasses.


You can also check gluten development in your kneaded dough by performing what is called a 'Window Pane Test'.
The Window Pane test is performed by taking a small piece of dough off the kneaded dough mass and pinching it between your thumbs and first two fingers. If you can expand your fingers, stretching the dough into a thin sheet that is translucent when held up to a light source, your gluten is developing!

This is a beautiful example of what your dough should look like, from noahw's Instructable about Woodfired Bagels. YUM!
If the dough rips while you are stretching and checking for development, add your sample piece back into the larger mass and continue kneading for a few minutes until you re-test to achievea glow coming through an even sheet of dough.
Place your dough into a clear bowl so that you may monitor its development progress, and allow to rest for 1-2 hours or until it has doubled in volume.
Step 6: Bulk Ferment

Welcome to your first bulk ferment. We refer to this step as a bulk ferment because we are letting our whole dough ferment as one bulk mass, before dividing it up into a final shape or forming it for a secondary proofing. (More on shaped secondary proofing later)
As the yeast activates and begins to feed, fermentation begins to occur within our bread, and the starches start breaking down. Carbon dioxide gas begins bubbling up within the dough, and the gluten network within the loaf begins to expand. This is how the gas-filled cellular structure of our bread is created!
In a 72-78 degree kitchen, this first rise should take about 1-2 hours. You want your dough to double in volume, any growth beyond double and you move into the danger zone of an over-proofed dough.
Note: You will know if you have over proved your dough because the dough will become quite globular when trying to shape it. The gluten has broken down completely because the yeasts have eaten all the available food in the dough.
The above video shows the complete doubling of this loaf. Choose a clear bowl or container for your bulk fermentation that allows you to see all sides of the dough while it grows. The bowl should be at least twice as large as the dough ball just after kneading.
While you are waiting for your dough to rise, keep in mind that temperature effects every part of breadmaking. That is why we try to control the temperature of our ingredients, particularly water. The warmer your dough's temperature is, and remember to factor in the ambient temperature of the room you are proofing the dough in, the faster your dough will rise.
We can use this concept to our advantage if we need to, by placing doughs in barely-warm ovens if we want a fast prove, but we sacrifice flavor development by skirting a longer rise time. Some bakers choose to stretch out their proving times by placing loaves in cold temperatures of refrigerators, or even overnight outdoors, giving the active leaven cultures the time to work slowly and develop a tangier yeasty flavor. We'll go over this more in our sourdough lesson.
For this first loaf, take the time to proof it out of the fridge. In other lessons, we will use the refrigerator to slow our ferments and proofs to help develop flavor and encourage more rigid forming, but for this lesson, observe the science happening on your countertop.
Step 7: The Importance of Temperature and Time

While you are allowing your dough to bench rest and proof on the countertop, here is some more reading on the temperatures of your ferments. (Yes, it's really that important!) Temperature sets the speed at which dough ferments. Optimal fermentation occurs at around 75 degrees Fahrenheit, both inside and outside of the dough.
Note: Have you been paying attention to the use of the terms Ferment, Proof, and Bench? They are all terms that are often used interchangeably by bakers but they all mean the same thing - giving your dough time to form a cohesive gluten network, ferment, and expand.
If you really want to know about what is happening inside your loaf, probe the dough with a stick thermometer. If your dough is cooler than 72 degrees, or warmer than 78 degrees, fermentation will happen too slowly or too quickly.

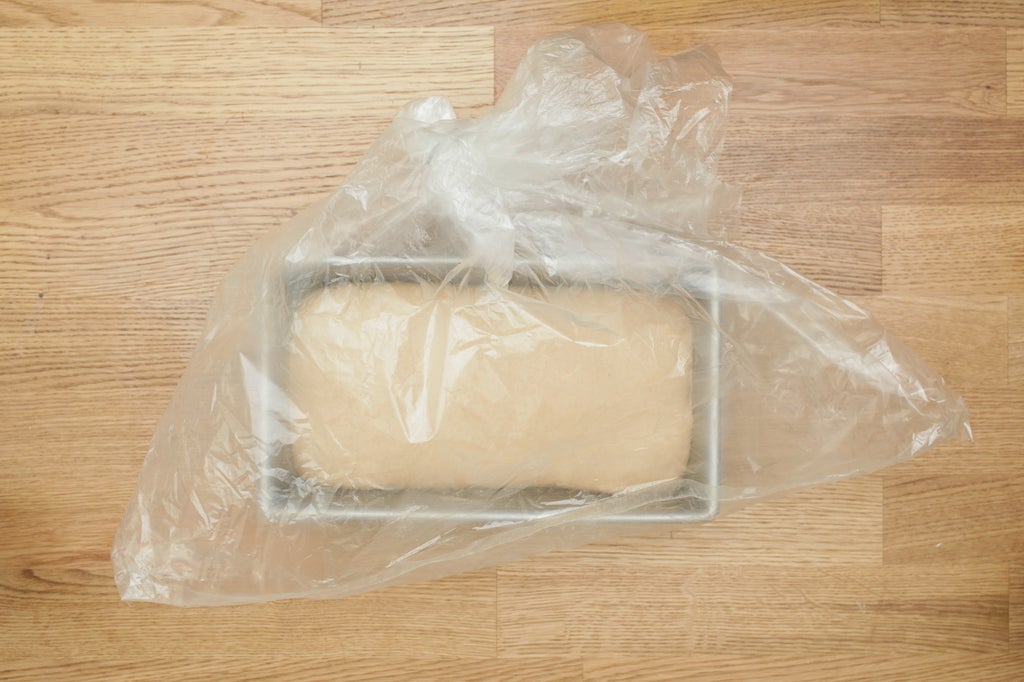
I live in Los Angeles, a place not particularly known for its cool damp days. There are a few precautions I am constantly taking to make sure my bread does well in my climate. During bulk proves, I stop doughs from drying out by placing bowls into large turkey oven bags. This creates a little terrarium of humidity to stop the loaf from drying out as it ferments. Furthermore, there are days when I don't proof my doughs in my kitchen, but instead in front of the AC unit in my bedroom. I drag a stool in there, put a heavy book on top of the stool, and set the dough container on top of the book.
We can combat ambient temperatures by trying to calibrate water temperatures. If it is super chilly out, and nowhere in your house is above 65 degrees, you can boost the temperature of the water to encourage a more rapid yeast development in your dough. The reverse can be applied for overly warm days.
In short, warm temperatures mean you will have fast rises, and cold temperatures will yield much slower rises. You can control the speed of fermentation with temperature.
Step 8: Forming Your Loaf for Its Final Shaped Prove.
For this classic white bread, we will be forming dough into a loaf pan. Bread has a real tendency to get stuck to the pan in the oven. This can be prohibited by oiling and flouring the pan before you place your dough in it, but I prefer using parchment paper. Parchment paper doesn't introduce any oil into the crust and works as an even better non-stick agent.


To start, size a piece parchment paper for the loaf pan like pictured above, then place your loaf pan on top of the paper. Mark your paper where the loaf pan's corners sit.


Cut from the corners to the dots you marked on paper, and fold all of the newly created tabs towards the center of the paper.

Slide the folded paper into the loaf pan, and flour lightly.
Turn the dough out onto a lightly floured work surface, a countertop or cutting board is perfect, then throw a small amount of flour on the top of the dough you just removed from the bowl.
Pat the dough down into a rough oval. Then fold the bottom third of the dough towards the center of the dough, and rotate the dough 180 degrees. Stretch the dough nearest you toward your body, and then fold towards the top third of the dough. Take this dough-burrito shape and fold it in half one more time, pushing the seam into your work surface as you move across the dough.
When you have this long shape, give it a squeeze to shorten the length and then transfer into the paper lined loaf pan. Press down onto the dough so that it is evenly distributed in the loaf pan. This also ensures that we have good gas distribution inside the dough. Cover with a barely damp towel, or slide the whole thing into an oven bag to prove.
Don't have a loaf pan? No problem! Instead, just transfer this shaped dough to a cookie sheet. This loaf will rise differently, expanding outwards instead of upwards. You'll also have to reduce your cook time by 5-10 minutes.

Allow to double in size once again, poking the dough every once in a while to see how it's feeling. A fully proved dough will spring back slowly after nudging it, feeling smooth and bubbly, but also still holding its shape. A good metric of readiness in a loaf pan is when the dough is doming about one to two inches over the top lip of the loaf pan.
Begin preheating your oven to 375 when your loaf has almost doubled in size, at least 20 minutes before you anticipate popping your loaf in the oven. When a dough goes through its secondary forming prove, the loaf can become over-proved if allowed to expand beyond double.
Step 9: Cooking

If you like a soft chewy crust, this dough can be baked at 375 degrees Farenheight until golden brown. This will take between 40-50 minutes. To know when the loaf is done baking, give the top of the loaf a good knock on the top of the crust. If the loaf makes a sound like a hollow wooden box, it is time to pull it out of the oven.
I'm using a 9"x5" loaf pan. If your loaf pan is a smaller 8"x5" pan, you will have to adjust your cook time to be slightly longer, if your loaf pan is larger than 9"x5" your cook time will have to be slightly shorter. The more surface area of the dough that is exposed, the faster it cooks. This is why cooking on a cookie sheet takes even less time.
If you like a slightly crispier crust, bake at 400 for about 35-45 minutes, looking for a deep golden brown color, as opposed to a golden color.


Before placing in the oven, score the top of the loaf so that the shape does not tear during baking. Using a lame, drag one long line across the top of the loaf. Hold off on scoring until right before you place the pan in the oven. We score loaves so that steam is able to escape during oven spring before our crust is completely formed.
Oven spring refers to the final feeding frenzy that the yeast go through, pushing the last bits of gas into your loaf, before dying off at high temperatures. The loaf will meet its max rise just before the crust hardens. If your loaf grows a lot in the oven, your crumb structure will be airy, but if you see minimal spring, you will most likely have a denser loaf. Your oven spring will be different depending on the ingredients and hydration levels in your dough. A good way to observe spring is the expansion in your scores.
During the last part of the bake, the gluten network inside the dough hardens and our dough is cooked by hot steam inside the loaf. Start checking your dough with some frequency 20 minutes into your bake. We know our bread is done when it's crust is a deep golden brown. (NOT light gold!) You can check the internal temperature with a probe thermometer. If the thermometer has a reading of 200 degrees or more your loaf is done, temperature above 215 degrees and your loaf may have a hard crust once it's cooled. I always shoot for a range of between 202-206 inside a loaf.
Step 10: Cooling

After removing your loaf from the oven, you want to wait at least 30 minutes for your bread to cool. There is a lot of steam inside your loaf, trapped inside its crust when you first pull it out of the oven. We want all that steam and moisture to stay in there! Cutting bread right after it comes out of the oven risks a very dry loaf, once it is fully cooled.


The best way to cool your loaf is with the use of a cooling rack. The cooling racks I use have two heights, for super hot loaves of bread, I find that using the taller height of the rack cools the loaf faster.
Step 11: Slice and Serve


A note on cutting bread. We are going to make some amazing loaves in this class, with beautiful crumb structures and varying levels of crustiness, please be kind to your loaves while slicing. Squished bread is sad bread. We worked really hard to put all that air in there!

In one hand grip the loaf firmly, without compressing or squeezing. Start moving a serrated knife in a sawing motion before you even hit the top of the bread. Slice at a 45-65 degree angle to the bread at the beginning of your cut, and then once you are through the crust you may work your knife to be parallel to the loaf. Cutting a slice of bread is actually very similar to sawing a piece of wood.

This loaf is perfect with just butter or jam - or completely alone, honestly! Sometimes I will whip this loaf up in the evening just to make french toast with it the following morning.
Step 12: Storing

If you aren't going to eat all your bread within a week of baking it, consider freezing it. You can freeze a loaf of bread by wrapping it in aluminum foil to prevent freezer burn, then placing it in a freezer bag to prevent moisture loss. A bread that has no oil in it (like this first loaf) can keep up to 6 months in the freezer before starting to see a real decline in flavor. A bread that is richer, and has some fats, or a higher sugar and salt content, can last up to 2 years in the freezer!
Historically, home-bakers would store their bread in breadboxes. Bread doesn't go stale because moisture is being wicked away from the bread, instead, bread goes stale because moisture in your loaf is moving towards the crust.
Breadboxes prevent bread from going stale because they are designed to keep the baked goods fresh at room temperature, have a lid loose enough to allow airflow, reducing moisture buildup that may occur from storing in plastic bags and thusly, mold-free. The lid of a bread box is also tight enough to protect the breads from common household pests.

Not everybody has room for a breadbox in their kitchen, I know my tiny apartment doesn't. When I was still living in the damp Bay Area, I could store breads on my countertop with just a kitchen towel around the loaf to create micro-breadbox type environment for the bread.

These days in my drier climate, I have had the best luck storing bread in Press'n'Seal. It seems to be a glorious mix of air and protection to maintain a good moisture level that doesn't get stale on the shelf. It also stands up to breads that are wacky shapes and won't fit in a standard kitchen bag. (Like baguettes!)

Post your white bread results below, and reach out if you have questions or challenges with this bake! Good luck, and can't wait to see and read all about your baking adventures.


