

Introduction: Uber Cheap 360 Video Camera


Have you ever wanted to make a 360 degree videos without spending a fortune on a 360 video camera? Well, if you have $15, a Raspberry Pi and a webcam lying around, then you can make your own 360 degree videos!
If you don't want to read through the steps, feel free to watch my youtube videos that cover the same process:
Here's What you will need:
- Kogeto Dot ($15)
- Raspberry Pi 3 ($35 - if you don't already have one)
- Raspberry Pi Webcam ($25 - if you don't already have one)
If you already have a webcam and Raspberry Pi, then the total cost of this project is only $15.
Step 1: The Inspiration


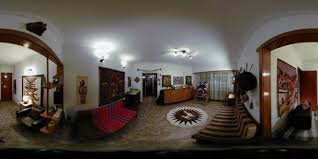
360 degree video is the new hot trend, but when it comes to 360 degree video cameras, most rigs will cost you upwards of $700. Seeing as how I don't have $700 to waste, I began searching for a cheaper DIY alternative. One very promising method was using a spherical mirror. Those types of mirrors are quite often seen mounted to the ceiling in hospitals so that workers can easily see what's around corners. So taking a picture from underneath one of these mirrors produces a 360 degree view of what's around you.

But how can that become a 360 degree video? Well, using some software, this spherical image can be unwrapped. And if this is done with a series of images, it can then be stitched into a video. So technically, we can make a legitimate 360 video (that can be uploaded to Youtube) using a mirrored sphere and some software.
For the spherical mirror, I found this Kogeto Panoramic Camera for less than $15. It's intended for iPhone cameras, but it uses proprietary software in order to view it, and the videos aren't compatible with Youtube. Since we'd need a camera that needs to also de-warp and process the video, I decided to go with a Raspberry Pi and the Raspberry Pi Camera. Alright, let's get started.
Step 2: Prepping the Pi


If you're not familiar with a Raspberry Pi, it's a $35 single-board computer that's about the size of a credit card. The newest Raspberry Pi 3 has built in wi-fi and bluetooth, but There are a few things you'll need to get it up and running: a second wi-fi adapter to use as a hotspot (later on), a power cable, a mouse and keyboard, a monitor, and a Micro-SD card. Not to mention the Raspberry Pi camera. In order to start it up, you first need to install the Raspbian operating system on a Micro-SD card. You can download the newest version from here.
After it's downloaded, you can unzip the contents. If you're using Windows, insert your SD card and then use the free Win32DiskImager program to burn the image to the SD card. When it's done, eject the Micro-SD card and insert it into the Pi. With the camera, mouse, keyboard, and monitor attached, plug in the power to start it up. It should boot directly to the desktop. The first two things you want to do is click on Menu > Preferences > Raspberry Pi Configuration. Under the "System" tab, click on "Expand Filesystem". Then under the "Interfaces" tab, make sure the "Camera" option is enabled. Click "OK" and then reboot your computer.
Once your computer has booted back up, you can now click on the "Wi-Fi" icon in the upper right and connect to your local wireless network. Then you'll want to open up a command prompt and update your computer by typing:
sudo apt-get update
By the way, the default password is "raspberry". When it's through updating, we need to install SimpleCV. It can be quite daunting if you're not used to installing things on linux, so I've given it it's own dedicated step.
We also want to install a couple of codecs so that we can easily view and convert our video later.
sudo apt-get install libavcodec-extra-(52|53|5x)
sudo apt-get install libav-tools
Step 3: Installing SimpleCV

When it comes to having a computer automatically manipulate and detect what it's seeing through a webcam, it requires special software called "Computer Vision" software. In the instance of the Raspberry Pi, there's an excellent simple computer vision platform called "SimpleCV", based on the more in-depth OpenCV software. I've already done full tutorial on SimpleCV's capabilities and how to get started with it, so for this tutorial, I'll just explain how to install it.
You'll start by installing the dependencies and the SimpleCV software itself:
sudo apt-get install ipython python-opencv python-scipy python-numpy python-setuptools
sudo pip install https://github.com/sightmachine/SimpleCV/zipball/master
sudo pip install pyparsing svgwrite
In order to make Raspberry Pi work with the camera, you can use the built in V4L2 (video for linux) driver. You will have to type this command every time you restart your pi!! To launch it, simply type
sudo modprobe bcm2835-v4l2<code>
Step 4: Adding the Lens


The Kogeto Dot is intended to be used as an iPhone attachment, so it comes with a lot of extra plastic around the lens that needs to be trimmed off. I did this using both really sharp shears and a dremel. Then I smoothed out everything using some sandpaper. It's probably a good idea to put a little piece of tape over the lens hole so that you don't get any plastic pieces on the mirror. Now you should just have the round dome of the mirror and the lens, but how do we get it to fit on the camera?
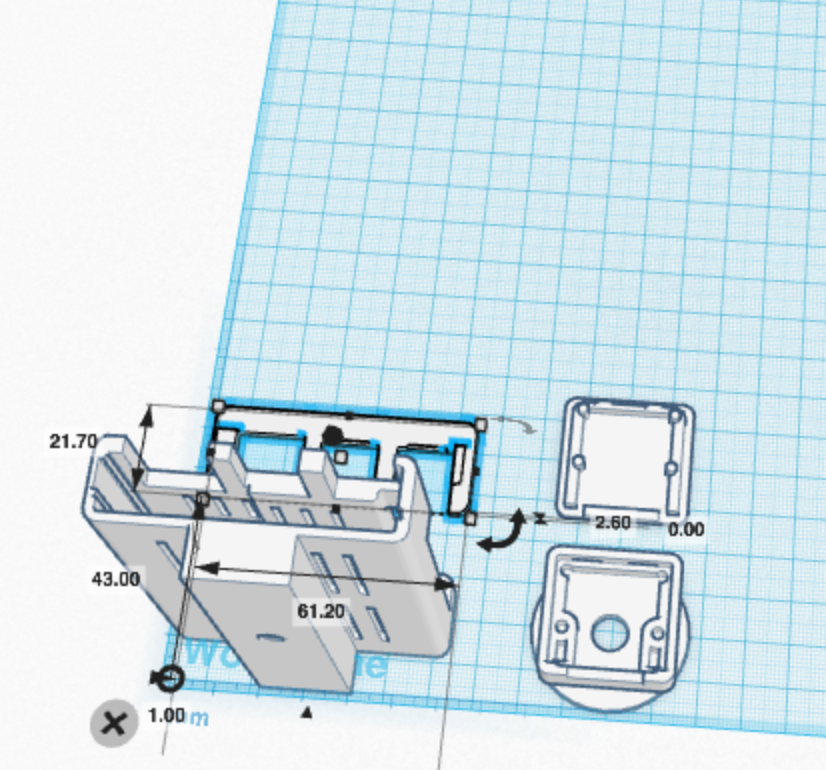
To test it out, I simple used pieces of cardboard to keep it propped over the camera, but a more permanent solution was to 3D print a case for the camera that could support the panoramic lens on top of it. Since I was firing up the 3D printer anyway, I decided to also design an integrated case that could easily be mounted on to a tripod. You can download and view my 3D printed files over at Thingiverse. Once everything was printed, I just added a couple dabs of hot glue to secure the camera and the lens. Now it's time to make some videos!
Step 5: Creating Web Controls


What does a web server have to do with a 360 camera? Well, it can provide us with a simple way to remotely view and control our camera. This is one of several potential methods to control the camera, so if you have a different preferred way (GPIO button, touch screen, etc) feel free to skip this step.
There are a few different options for web servers out there (apache, nginx, lighttpd), but I'm going to go with lighttpd because it's light weight, as the name suggests. Since we want it to interact with the Pi, we'll also need to install the PHP libraries and enable lighttpd to use them:
sudo apt-get install lighttpd
sudo apt-get install php5-common php5-cgi php5
sudo lighty-enable-mod fastcgi-php
sudo service lighttpd force-reload
sudo chown -R www-data:www-data /var/www
sudo chmod 775 /var/www
Now if you open up a web browser and go to 127.0.0.1 you should see the default webpage...but that's not at all helpful to us. What we need to do instead is create a webpage that can control our 360 camera remotely. Luckily, I've already done this for you. All you have to do is go to your webpage host folder, download the controls I created, and then unzip them. ***The code is also available on Github for download/review***
cd /var/www/html sudo wget http://www.tinkernut.com/demos/360_cam/360_cam_server.tar.gz
sudo tar -xzvf 360_cam_server.tar.gz
(or if you want to use git)
cd /var/www/html
sudo git clone https://github.com/gigafide/360_pi_cam.git
Now if you go to your webpage again, you should see some control buttons, but they won't work just yet...we need to finish the tutorial first ;-)
Step 6: Turning the Pi Into a Hotspot


The second stage in making our web controls is to turn our Pi into a wi-fi hotspot. Why? So that we can connect to it and control it without needing a router or internet connection. This way the Pi is completely self contained. The first thing is to add a second wi-fi adapter, similar to this one. Then we need to tell the Raspberry Pi what to do with it. First we edit the dhcpcd.conf file and tell Raspbian to ignore it (it's wlan1):
sudo nano /etc/dhcpcd.conf
#add this to the bottom of the file
denyinterfaces wlan1
Then we need to set it up with a static IP address. You can use the IP address format I use below, or if you know what you're doing, you can create your own:
sudo nano /etc/network/interfaces
#find your wifi card (wlan1) and change it to this
allow-hotplug wlan0
iface wlan0 inet static
address 192.168.101.1
netmask 255.255.255.0
network 192.168.101.0
broadcast 192.168.101.255
# wpa-conf /etc/wpa_supplicant/wpa_supplicant.conf
To make it function as a hotspot, we need to install and configure the "hostapd" software.
sudo apt-get install hostapd
sudo nano /etc/hostapd/hostapd.conf
#Paste this into the hostapd.conf file
# This is the name of the WiFi interface we configured above
interface=wlan1
# If this driver doesn't work for you, google what driver goes with your specific adapter
driver=nl80211
# This is the name of the network
ssid=360cam
# Use the 2.4GHz band
hw_mode=g
# Use channel 6
channel=6
# Enable 802.11n
ieee80211n=1
# Enable WMM
wmm_enabled=1
# Enable 40MHz channels with 20ns guard interval
ht_capab=[HT40][SHORT-GI-20][DSSS_CCK-40]
# Accept all MAC addresses
macaddr_acl=0
# Use WPA authentication
a
uth_algs=1
# Require clients to know the network name
ignore_broadcast_ssid=0
# Use WPA2
wpa=2
# Use a pre-shared key
wpa_key_mgmt=WPA-PSK
# The network passphrase
wpa_passphrase=raspberry
# Use AES, instead of TKIP
rsn_pairwise=CCMP
Keep in mind to change the interface (if you need to), the driver (if you need to), the SSID name, and the passphrase to match your setup. Now we need to tell hostapd where to look for this file:
sudo nano /etc/default/hostapd
#paste this underneath #DAEMON_CONF=""
DAEMON_CONF="/etc/hostapd/hostapd.conf"
Finally, we need to install DNSMASQ to do the DNS and DHCP routing for us. Then we need to configure it:
sudo apt-get install dnsmasq
sudo mv /etc/dnsmasq.conf /etc/dnsmasq.conf.orig
sudo nano /etc/dnsmasq.conf
#PASTE THIS INTO THE DNSMASQ CONF FILE
interface=wlan1 # Use interface wlan0
listen-address=192.168.101.1 # Explicitly specify the address to listen on
bind-interfaces # Bind to the interface to make sure we aren't sending things elsewhere
server=8.8.8.8 # Forward DNS requests to Google DNS
domain-needed # Don't forward short names
bogus-priv # Never forward addresses in the non-routed address spaces.
dhcp-range=192.168.101.50,192.168.101.150,12h # Assign IP addresses between
192.168.101.50 and 192.168.101.150 with a 12 hour lease time
The last thing to do is to start the services
sudo service hostapd start
sudo service dnsmasq start
You should now see your wi-fi SSID being broadcast. If not, just restart your Pi.
Step 7: Recording Video


Now that we have our 360 PiCam ready, it's time to find a place that you want to record, and set everything up. I mounted the camera onto a Tripod and powered it with a 5v USB battery pack. Once booted up, you should be able to connect to it by selecting "360_cam" from your wireless connections and connecting to it from any web-enabled mobile device. Then point your web browser to the static IP address that we assinged to the Pi above (192.168.101.1). You should see the web controls to "Start Preview", "Stop Preview", and "Record". Starting the preview allows you to view the camera through the webpage so that you can adjust it as necessary. Before recording, however, you must stop the preview screen. Now you can hit "Record". It will record for 5 seconds (which can be adjusted in the code).
Step 8: Dewarping the Video


I've made a bash script to make the dewarping process much easier. The code that does the dewarping is based on the wonderful work by Kathrine Scott who has posted her code up on Github. It's great for an initial proof-of-concept, however the results are very blurry. Along with adjusting the focus on the Pi Camera, I tweaked the code to smooth out some of the pixelization. If you download the files from step 5, the unwarping python code is located in /var/www/html/python/new_dwarp.py. Feel free to view and edit the code to fit your needs. Normally you would have to run the python code and then an avconv command to output a video. However, I tried to make it simpler by creating an automated bash script that should run through the process for you. So just run these commands to get the process started:
cd /var/www/html/
sudo chmod +x dewarp.sh
sudo ./dewarp.sh
You should see an image appear on your screen. Without clicking on anything else, click on the center of the image first. Then move to the right and click on where the actual image begins. Move to the right again and click on where the actual image ends. Then hit the ESC key. If you click on anything else during this process, the script will error out. Now it should start processing the video and then convert it storing the final video on your Pi's desktop as "360_video.mp4"
Now you can save this file to a USB drive because we'll need to finish up on a PC or a mac.
Step 9: Viewing the 360 Video


The final step is to view the video in 360 mode! If you were to just play it in a standard video player, it would just look like an extra wide video. So we're gonna need a special viewer if we want to preview it. Luckily, the Kolor company has a GoPro VR Viewer that can view 360 videos. Just install it and open your video to see how it looks.
But the main point of this project is to make a 360 video that can be uploaded to Youtube. In order to do that, Youtube has a list of steps you must follow before uploading it. But basically you have to download their "Metadata Injection" script that inserts metadata into the video so that Youtube knows it's a 360 video whenever you upload it. Once you've done that, then just upload it to Youtube. I've posted two of my sample videos at the top of this article so that you can see what it looks like. I hope this inspires you to make your own. Have fun!

Participated in the
Circuits Contest 2016


